A veterinary emergency clinic in central Jersey sees at least two dogs per month with injuries directly caused by improperly used seat belts — not from accidents, but from the restraint system itself working against the dog because the owner installed or fitted it wrong. The intention was safety; the result was a twisted spine, a choked neck, or a harness burn that required treatment. Owning a dog safety belt is not the same as using one correctly. Dog travel safety depends entirely on proper application — a $50 crash-tested belt installed wrong provides less protection than a $15 basic tether used correctly. These seven mistakes represent the most common errors that transform safety equipment into hazards, waste money on products that cannot perform as designed, and create a false sense of security that leaves both dogs and passengers vulnerable during the exact moments protection matters most.
Attaching the Seat Belt to a Collar Instead of a Harness — Why Is This Dangerous?
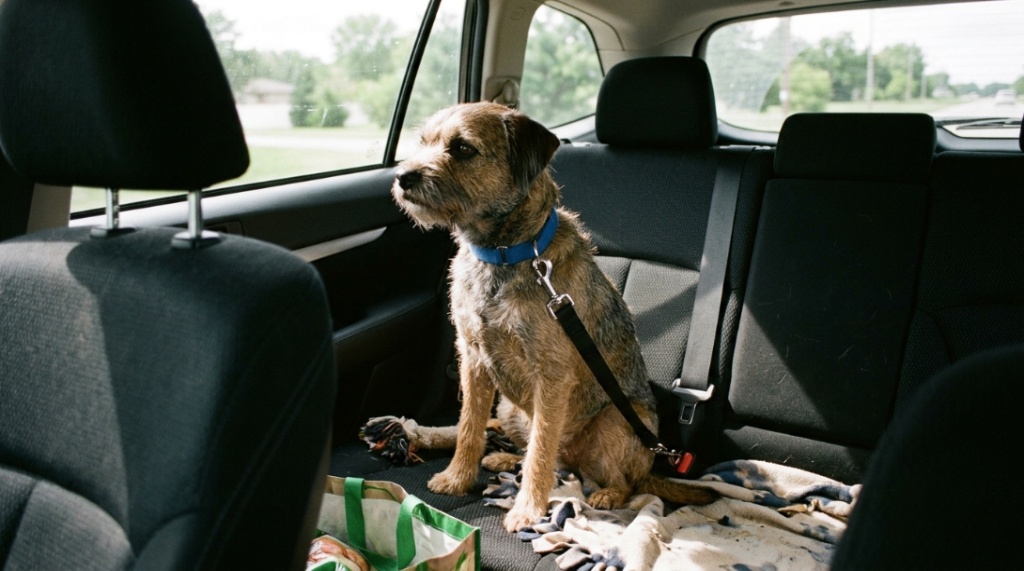
Attaching a dog seat belt to a collar concentrates all sudden-stop force directly on the trachea, cervical spine, and neck muscles — creating risk of tracheal collapse, spinal injury, choking, and internal decapitation even at relatively low speeds.
The physics make this clear. During a 30 mph sudden stop, a 50-pound dog experiences approximately 1,500 pounds of forward force. That force must be distributed across a sufficient area to prevent injury:
- Collar attachment: 1,500 lbs concentrated across a 1-inch-wide band around the neck. The trachea can sustain approximately 30–40 lbs of direct pressure before damage occurs. The result is catastrophic neck injury.
- Harness attachment: 1,500 lbs distributed across chest, shoulders, and ribcage — an area 50–100 times larger than a collar. Each square inch bears manageable force levels.
Even during routine hard braking (not accidents), collar-attached belts apply enough force to cause:
- Tracheal bruising or collapse (especially in small breeds)
- Cervical disc compression or herniation
- Laryngeal damage affecting breathing and bark
- Ocular pressure increase (potentially damaging in brachycephalic breeds)
- Esophageal trauma
The rule is absolute: never, under any circumstance, attach a vehicle restraint system to a collar. If your current seat belt only has a collar clip, replace it with a harness-compatible system immediately.
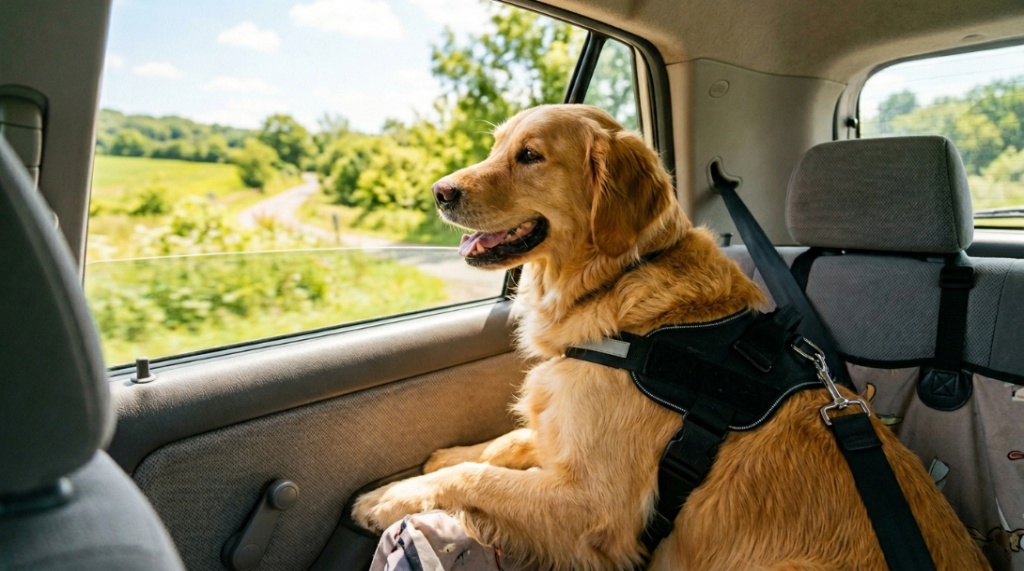
Mistake #2: Using a Walking Harness Instead of a Travel Harness What Is the Difference?
Walking harnesses have front or side D-ring attachment points designed for leash control — during a crash, these positions cause the dog to rotate violently forward and sideways, potentially twisting the spine. Travel harnesses have dorsal (back) D-rings positioned between the shoulder blades, designed to arrest forward motion without rotation.
Critical design differences:
| Feature | Walking Harness | Travel/Crash Harness |
|---|---|---|
| Primary D-ring position | Front chest or side | Dorsal (between shoulder blades) |
| Strap width | Narrow (0.5–1 inch) for comfort | Wide (1.5–2+ inches) for force distribution |
| Padding | Minimal or comfort-focused | Impact-absorbing at stress points |
| Stitching | Standard single or double stitch | Bar-tack reinforced at all load points |
| Force rating | Not rated for crash forces | Rated 1,500–3,000+ lbs |
| Crash testing | None | CPS certified or third-party tested |
| Body coverage | Minimal straps | Full chest plate, multiple connection points |
A walking harness attached to a seat belt will likely fail in a serious accident. The narrow straps cut into skin under force, the front attachment rotates the dog forward (head-first into the seat back), and the stitching was never designed for impact loads. Invest in a dedicated travel harness — your walking harness stays for walks.
Mistake #3: Setting the Tether Too Long — How Much Slack Is Too Much?
Any tether length that allows your dog to reach vehicle windows, stand fully on the seat, or contact the front seat backs during forward movement is too long — excessive slack adds momentum distance that multiplies impact force exponentially during sudden stops.
The physics of excess tether length:
- At correct length (6–12 inches slack): Dog moves 6–12 inches forward before restraint engages. Manageable deceleration force.
- At 18+ inches slack: Dog accelerates forward 18+ inches before restraint catches. Significantly higher force at engagement due to built momentum.
- At 24+ inches slack: Dog may reach the front seat back before the tether engages — the tether catches mid-impact rather than preventing impact entirely.
The momentum equation: Force = Mass × Velocity². Even small increases in free-travel distance create large force increases because your dog accelerates throughout that distance during sudden deceleration.
How to find correct length:
- Have your dog sit normally in position
- Adjust until 6–12 inches of slack exists in the tether
- Test: gently push your dog forward — the tether should engage well before any body part could contact the front seat
- Test: your dog should still lie down, sit, and turn around without the tether restricting these positions
When in doubt, shorter is safer. A slightly restricted dog is far safer than an over-extended one.
Mistake #4: Never Inspecting Equipment Before Drives — What Can Fail?
Dog seat belt components degrade through UV exposure, temperature cycling, pet saliva, mechanical wear, and repeated loading/unloading — buckle springs weaken, webbing frays, stitching loosens, and metal fatigues, all creating invisible failure points that reveal themselves only during emergencies.
What to inspect before every drive (30 seconds):
- Webbing/tether: Check for fraying, cuts, thinning, or sun-bleached sections. Run your hand along the full length feeling for damage invisible to quick glances.
- Buckle/clasp: Open and close — it should snap firmly with resistance. A buckle that opens easily or does not click positively has a weakened spring mechanism.
- Carabiner/snap hook: Gate should close completely and lock (if locking type). Check for cracks, bent gates, or sticky mechanisms.
- Stitching: Look at bar-tack reinforcement points (where webbing attaches to hardware). Loose threads or visible gaps indicate structural compromise.
- Harness straps: Check for chewing damage, stretched elastic sections, or hardware that has worn grooves into the webbing.
Replace schedule:
- Immediately: Any visible damage, failed inspection point, or after any accident (even minor)
- Every 2–3 years: Standard replacement cycle even without visible damage (material fatigue is invisible)
- Every year: For daily-use equipment in extreme climates (high UV, extreme temperatures)
Mistake #5: Not Adjusting for Growth or Weight Changes — Why Does Fit Change?
A harness that fit correctly 6 months ago may be dangerously loose or tight now due to weight gain/loss, muscle development, coat changes between seasons, or aging-related body composition shifts — creating gaps that allow slipping or pressure points that cause injury.
Common fit-change scenarios:
- Puppies: Growing dogs can outgrow a harness in 4–8 weeks. Check fit weekly and size up when you can fit more than 3 fingers under straps.
- Weight gain: Even 5 lbs changes chest circumference. Straps that were snug become constrictive, cutting into skin or restricting breathing under load.
- Weight loss: Senior dogs or those on diet plans lose mass, creating harness slack that allows sliding out during impact.
- Seasonal coat: Double-coated breeds gain significant girth in winter coat. A harness fitted over summer coat is too tight over winter coat (and vice versa).
- Muscle development: Active dogs build chest muscle over time. Athletic dogs may outgrow harness width faster than weight suggests.
The 2-finger rule: at every fitting check, you should be able to slide exactly 2 fingers (flat, not bunched) between any strap and your dog’s body. One finger = too tight (breathing restriction under load). Three+ fingers = too loose (slipping risk).
Check fit monthly for adult dogs and weekly for puppies or dogs experiencing weight changes.
Mistake #6: Using the Seat Belt Only on Long Trips — When Should You Use It?
Use your dog seat belt on every single car ride regardless of distance — 80% of pet car accidents occur within 5 miles of home on familiar roads where both drivers and dogs are least vigilant about safety protocols.
Why short trips are actually more dangerous:
- Lower perceived risk: Owners skip the seat belt for “just a quick drive,” exactly when complacency creates vulnerability.
- Familiar routes: Drivers pay less attention on known roads, increasing accident likelihood.
- Lower speeds feel safer: A 25-mph impact produces enough force to cause serious injury to an unrestrained dog.
- More frequent stops/turns: City driving involves more sudden braking opportunities than highway cruising.
- Windows often down: Short trips in warm weather = open windows = ejection risk.
The math: if your dog rides in the car 5 times per week and you skip the seat belt on “short trips” (3 of those 5), your dog is unprotected 60% of the time. Accidents do not schedule themselves for your long-trip days.
Make it routine: seat belt goes on before the engine starts. Every time. No exceptions. The 30 seconds it takes saves you from being the person who explains to their vet that they “just didn’t bother this one time.”
Mistake #7: Assuming Any Seat Belt Provides Crash Protection — What Does Not Qualify?
Many products marketed as “dog seat belts” are simple tethers that prevent wandering but provide zero actual crash protection — real protection requires crash-tested construction with verified force ratings, proper materials, and engineering designed to manage impact energy.
What actually provides crash protection vs. what just looks like it does:
- Genuine crash protection: Products tested to CPS standards or equivalent, with published force ratings, bar-tack reinforced stitching, marine-grade hardware, and energy-absorbing design elements (controlled stretch zones that decelerate gradually rather than stopping instantly).
- Basic tether only (no crash protection): Thin webbing, plastic buckles, no force rating published, no testing documentation, designed to prevent wandering during normal driving but will fail or cause injury during actual accidents.
Red flags indicating a “seat belt” that is actually just a leash connector:
- Webbing less than 1 inch wide
- Plastic or lightweight metal hardware
- No force rating or testing information available
- Price under $15
- Marketed primarily for “convenience” rather than “safety”
- No harness compatibility requirements mentioned
A basic tether is better than nothing — it prevents window ejection and driver distraction. But it is not crash protection. Know what you have and upgrade if genuine protection matters to you.
For verified crash-tested options that provide genuine protection, the best crash-tested dog safety belts reviewed provides detailed analysis of products that meet actual safety standards — helping you distinguish real protection from marketing claims.
Conclusion
Every one of these seven dog seat belt mistakes is preventable with basic knowledge and a 30-second pre-drive routine. Never attach to a collar. Use a travel harness, not a walking harness. Keep the tether short enough to prevent dangerous forward travel. Inspect equipment before every drive. Adjust for body changes. Use it every single trip. And understand the difference between a basic tether and genuine crash-tested protection.
The dog owners who never deal with restraint-related injuries are not lucky — they simply learned correct usage once and applied it consistently. Your dog trusts you with their safety every time they jump into the car. Honor that trust with 30 seconds of proper installation and the knowledge that your equipment actually works as intended. The alternative — learning these lessons through an emergency vet visit — costs infinitely more in money, time, and heartbreak.
Which of these mistakes have you seen (or made yourself)? Share your experience below your story could prevent someone else’s emergency.
Frequently Asked Questions
How do I know if my dog’s seat belt is crash-tested?
Look for specific documentation: Center for Pet Safety (CPS) certification, published test speed and force ratings, named testing laboratory, and detailed test methodology descriptions. If a manufacturer claims “crash-tested” but cannot provide specific test data, certification details, or testing laboratory name upon request, their claims are unverified and unreliable.
Can a dog seat belt hurt my dog during normal driving?
A properly fitted seat belt with correct harness and appropriate tether length should never cause discomfort during normal driving. If your dog shows signs of distress (panting, whining, trying to escape the harness), check for: straps too tight, harness rubbing at armpits, tether too short restricting comfortable positions, or anxiety that requires gradual desensitization training.
Should I use a seat belt if my dog gets car sick?
Yes — an unrestrained carsick dog is still a safety hazard during sudden stops. For carsick dogs, use the seat belt with a raised platform or booster seat that allows them to see outside (reduces motion sickness), ensure adequate ventilation at their level, and consult your vet about anti-nausea medication for travel. Safety restraint and motion sickness management are separate issues that should both be addressed.
How do I transition my dog from no seat belt to using one?
Introduce gradually over 1–2 weeks: Day 1–3: put harness on at home with treats, no car. Day 4–6: harness on in parked car with treats. Day 7–9: harness and tether connected in parked car. Day 10–12: short 5-minute drives. Day 13+: gradually increase duration. Never force compliance — build positive associations through treats, praise, and patience.
Is it legal to drive with an unrestrained dog?
Laws vary by state. Some states (including New Jersey, Hawaii, and Rhode Island) have specific laws requiring pet restraint. Many others can cite drivers for “distracted driving” if an unrestrained pet interferes with vehicle operation. Beyond legality, insurance companies may reduce or deny claims if an unrestrained pet contributed to an accident. Restraining your dog protects both their safety and your legal/financial position.
Can my dog wear the seat belt harness for walks too?
While technically possible, travel harnesses are not designed for walking. They are bulkier, position the D-ring on the back (providing less walk control than front-clip designs), and may restrict natural gait due to wider straps. Use your travel harness for the car and your walking harness for walks — each is optimized for its intended purpose.
What should I do if my dog panics in the seat belt?
Stop the car safely, calm your dog without removing the restraint immediately (removing reinforces panic behavior). Check for physical causes: pinching, rubbing, restriction. If the issue is anxiety rather than physical discomfort, return to gradual desensitization training. Some dogs benefit from anxiety wraps, calming supplements, or prescribed medication during the conditioning period. Never drive with a panicking restrained dog stop and address the issue.